Author Topic: KevShek' DL1000 K3 - with Mods & How To's  (Read 29774 times)

0 Members and 1 Guest are viewing this topic.

Offline kevshek

  • Member
  • ***
  • Joined: Feb 2012
  • Posts: 320
KevShek' DL1000 K3 - with Mods & How To's
« on: March 08, 2012, 18:54:09 »
Thought id start up a thread for my Vee, and add pics/text as I go about fitting various mods.
So we start with a 54 plate K3 with 18900 miles on the clock, purchased used at the beginning of march 2012


Mods so far
1) Oxford Hot grips (came with the bike)
2) White rim tape (came with the bike)
3) Beowulf Rad and Oil Cooler Grills (came with the bike)
4) White LED side lights
5) H4 8000K HID kit
6) Scottoiler Touring Kit & Dual Injector (with LED plate light)
7) 12 Volt Power Socket
8) Centre Stand
9) HealTech GiPRO Gear Inidcator with TRE
10) Dual Hi/Low Tone Horn
11) Aftermarket mirrors (carbon wrapped)
12) Clear Indicators with Iridium Lenses
13) Yoshi Box Built, Tested and Adjusted
14) Suzuki Rack and Panniers, re-coloured carbon/silver
15) Hagon Front Springs
16) Hyperpro Rear Spring
17) Kappa 46 Zippy Top Box
18) Custom top box lighting
19) 530 Chain Conversion with Renthal Sprocket & Chain
20) HEED Engine Bars
21) SpeedoDRD Speed correction device
If you mod it, They will come!
My current bike HERE.
My Old Vee

Offline kevshek

  • Member
  • ***
  • Joined: Feb 2012
  • Posts: 320
Re: Kevs DL1000 K3
« Reply #1 on: March 08, 2012, 18:55:01 »

If you mod it, They will come!
My current bike HERE.
My Old Vee

Offline kevshek

  • Member
  • ***
  • Joined: Feb 2012
  • Posts: 320
Re: Kevs DL1000 K3
« Reply #2 on: March 08, 2012, 19:06:58 »
4) White LED side lights
5) H4 6000K HID kit


OK, so for my first mod, I thought id tackle some replacement LED side light bulbs and HIDs. It quickly dawned on my id have to strip a few bits off to get access, so off with the screen and dash surround.


God all this just to change a side light! hope they don't blow anytime soon!


While the dash was off though, it gave me plenty access to fit the HIDs. First off, the kit I have has twist off bases, allowing ease if installation. So off comes the bases.


With the original bulb out of the way, the HID base was fitted and secure back into place.


Next I took the dust cover and cut the collar off. This is a bit on the thick side and too tight to fit over the bulb solenoid. Once cut, the dust cover was slipped over and pulled back as far as I could get it.


Next come the task of mounting the bulb, pushing it into place and twist locking it aswell as pushing the dust cover around the back of the head light. Heres one I done earlier


Now to tackle the wiring. As the kit is meant for a car, I shortened the wiring to what I needed.The ballasts were then secure to the front cowel frame with velcro and ties. I ran a seperate fused live and earth to the battery to power these. The original wiring only power the movement of the solenoid and activates the light.


With both sides done and all cable tied and secure, the dash and screen was refitted completing the install. When it arrives, ill be installing a bar switch to switch my lights on/off independent of the ignition.
Heres the results. before and after.


If you mod it, They will come!
My current bike HERE.
My Old Vee

Offline macvisual

  • Member
  • ***
  • Joined: Apr 2011
  • Posts: 541
Re: KevShek' DL1000 K3
« Reply #3 on: March 09, 2012, 00:03:36 »
Enjoying your thread, keep us posted.


Any thoughts on fitting/adjusting any of the nice stuff below;

K&N air filter - ScottOiler - TRE - Power Commander - 43 tooth rear sprocket - dropping front forks (quarter of an inch) for quicker/faster steering etc....?
K8 DL1000GT - K&N filter - Hel brake line - lowered front forks - Osram brighter/whiter bulbs - TRE module - 43 tooth Renthal rear sprocket

Online 2112

  • Member
  • ***
  • Joined: Mar 2009
  • Posts: 12825
  • Bike: Triumph Tiger 1200 Alpine Edition
  • Location: Northumberland
Re: KevShek' DL1000 K3
« Reply #4 on: March 09, 2012, 06:54:23 »
Looking good gadge, those HID's are bright  :)))
It's pronounced 'twenty-one-twelve'

Offline kevshek

  • Member
  • ***
  • Joined: Feb 2012
  • Posts: 320
Re: KevShek' DL1000 K3
« Reply #5 on: March 09, 2012, 10:02:16 »
Quote from: "macvisual"
Enjoying your thread, keep us posted.


Any thoughts on fitting/adjusting any of the nice stuff below;

K&N air filter - ScottOiler - TRE - Power Commander - 43 tooth rear sprocket - dropping front forks (quarter of an inch) for quicker/faster steering etc....?
Thanks. I'm working on a deal for a GiPro w/TRE at present, but my next main purchases have to be my luggage. I do have a few bits on the way though, so will install them and update the thread as I go.

If you have any more suggestions, feel free and ill consider them.
If you mod it, They will come!
My current bike HERE.
My Old Vee

Offline macvisual

  • Member
  • ***
  • Joined: Apr 2011
  • Posts: 541
Re: KevShek' DL1000 K3
« Reply #6 on: March 09, 2012, 16:26:54 »
I'd drop the front forks next, easy 10 minute job and it does transform the bike alright! No more than around a quarter of an inch.

You'll have so much improved cornering & confidence with this done, trust me, it's worth it!


Enjoy...  :)
K8 DL1000GT - K&N filter - Hel brake line - lowered front forks - Osram brighter/whiter bulbs - TRE module - 43 tooth Renthal rear sprocket

Offline donny1972

  • Member
  • ***
  • Joined: Aug 2011
  • Posts: 147
Re: KevShek' DL1000 K3
« Reply #7 on: March 09, 2012, 17:39:09 »
Nice clear pics very impressed. Mac visual could you start  a thread on how to drop the front forks as I fancy this mod myself.

Offline kevshek

  • Member
  • ***
  • Joined: Feb 2012
  • Posts: 320
Re: KevShek' DL1000 K3
« Reply #8 on: March 09, 2012, 18:32:59 »
Its is dead easy to do, just loosen the 10mm bolts on the top and bottom yoke, there's one at the top
(see my sausage finger!)


And there's 2 on the bottom yoke
(again see my white sauage finger)


Then all you do is grab your fork and twist and push up at the same time. Measure the amount of protrusion at the top of the yoke, then retighten to spec and repeat for the other side.
Note: make sure you do exactly the same on both sides or you'll be riding on an angle! :grin:

BTW what is the torque setting for the yoke clamps?  [Edit: 23Nm]

Anyways, back to me :lala:
I've been doing a couple more things today, so will update with more details in a mo.
If you mod it, They will come!
My current bike HERE.
My Old Vee

Offline kevshek

  • Member
  • ***
  • Joined: Feb 2012
  • Posts: 320
Re: KevShek' DL1000 K3
« Reply #9 on: March 09, 2012, 19:05:10 »
First off, to see if I could eradicate the buffering on my head, I decided to cut down the screen.
Heres the original height of the screen, I've been told this could be an aftermarket item, but I don't honestly know.


I took some masking tape and tape off an area of about 1.5 inches.


Next, with my belt sander mounted on my workmate, I started to sand down the screen till I hit the tape line.
I then finished off the edges with a file and sand paper.


Then after flame polishing the edge, I refitted it.


After a quick blast, its better, but may need to go shorter a tad, maybe another inch.
Scottoiler next......
If you mod it, They will come!
My current bike HERE.
My Old Vee

Offline macvisual

  • Member
  • ***
  • Joined: Apr 2011
  • Posts: 541
Re: KevShek' DL1000 K3
« Reply #10 on: March 09, 2012, 19:19:11 »
"BTW what is the torque setting for the yoke clamps"?


Sorry, I don't know the torque setting, I just make sure the three 10mm bolts are very tight without over tightening them!

It's an excellent (free) up-grade to virtually any bike, I did the same a few years ago to my Yamaha TDM900, transformed the bike big style!
K8 DL1000GT - K&N filter - Hel brake line - lowered front forks - Osram brighter/whiter bulbs - TRE module - 43 tooth Renthal rear sprocket

Offline kevshek

  • Member
  • ***
  • Joined: Feb 2012
  • Posts: 320
Re: KevShek' DL1000 K3
« Reply #11 on: March 09, 2012, 19:23:16 »
6) Scottoiler Touring Kit & Dual Injector (with LED plate light)


Started off by assembling the injector onto its mount and set distance from the swing arm. This was just done by trial and error and placing it on the underside of the swing arm. (For reference, I used 1x thick spacer, 2x thin spacer along with the lock washers in between)


Test fitted in place and then the area was marked out with a pencil and taped off with masking tape.


Next I used some 80 grit paper and rubbed the area down so the superglue had something to adhere too.


Once glued, cable ties were installed to secure.


Next, I removed my plate, centred the Touring res, drilled the top 2 mounting hole and bolted it through.
The lower bolt required a spacer in between it and the mud guard, as there is a gap.


Holes were then measured and rilled into my plate and remounted with the 4 provided screws.


Now as the touring kit mounted behind the plate moves it out by about 1.5 inches, the rear plate light is useless, so I had bought ready a 3 LED plate light.


I simply drilled a small hole on the underside of the raised edge, passed the wire through it, then cut the original wiring from the OE light and soldered it onto my LED light.


And here we have that


Next I fed the oil line along the swing arm, using the provided sticky pad clips to secure it in place.


I then used a cable tie to secure the line to the back of the rear sub frame. This was to keep it away from the chain area.


The line was then fed up behind the frame and into the side/rear fairing. It was then secure along the top of the rear sub frame all the way to the rear light area.


If you look all the way back in the under seat area, you can feed wires/lines all the way to the tail unit. This is all I did to get the line to come down right at the back of the bike. there's some reinforcing sections of plastic moulded into the rear guard, I just drilled a 8mm hole where there was space and passed the oil line through it, saves tying it down and makes it look neat. I then did the same to pass it out to the scottoiler.


And here is is connected up.


The Vac line took basically the same route. I just removed the left side fairing and passed it through under the tank towards the TBs.


Looking up into the engine on the left side, I located the nipple on the front TB, is then simply connected it up with some of the clear tubing.


Next I set about filling and priming the system, which is just your basic scottoiler proceedure.
If you mod it, They will come!
My current bike HERE.
My Old Vee

Offline kevshek

  • Member
  • ***
  • Joined: Feb 2012
  • Posts: 320
Re: KevShek' DL1000 K3
« Reply #12 on: March 09, 2012, 19:27:40 »
Quote from: "macvisual"
"BTW what is the torque setting for the yoke clamps"?


Sorry, I don't know the torque setting, I just make sure the three 10mm bolts are very tight without over tightening them!

It's an excellent (free) up-grade to virtually any bike, I did the same a few years ago to my Yamaha TDM900, transformed the bike big style!

Its 23 Nm, I've just checked.
If you mod it, They will come!
My current bike HERE.
My Old Vee

Offline macvisual

  • Member
  • ***
  • Joined: Apr 2011
  • Posts: 541
Re: KevShek' DL1000 K3
« Reply #13 on: March 09, 2012, 19:31:37 »
Good thread and photo's, nice to see.

I re-fill my ScottOiler with (cheapo) Chain-Saw oil, bought from your local outdoor garden centre, I've been using it for past 2/3yrs with brilliant results, it's anti-fling as well, I swear by it!
K8 DL1000GT - K&N filter - Hel brake line - lowered front forks - Osram brighter/whiter bulbs - TRE module - 43 tooth Renthal rear sprocket

Offline kevshek

  • Member
  • ***
  • Joined: Feb 2012
  • Posts: 320
Re: KevShek' DL1000 K3
« Reply #14 on: March 09, 2012, 19:40:43 »
that's good to know, ill get some for next time, I've just about used up a bottle filling this lot up.
If you mod it, They will come!
My current bike HERE.
My Old Vee

Offline Juvecu

  • Member
  • ***
  • Joined: May 2009
  • Posts: 13454
  • Eat, Sleep, Ride, Repeat
  • Bike: '11 Versys 650 & '05 TT-R250
  • Location: Ryton-On-Dunsmore
Re: KevShek' DL1000 K3
« Reply #15 on: March 09, 2012, 23:10:43 »
Yes, 23Nm confirmed, same as the Wee :)

That chain has some stiff links, you can see it in the picture, you might want to consider a replacement, if you can't get them proper with the new oiler on.
Members Map                                                    Juv's Strom "Restoration" (sold to Mad Phil)
Juv & Locky's Morocco Trip Report                   Juv's Blog

Offline kevshek

  • Member
  • ***
  • Joined: Feb 2012
  • Posts: 320
Re: KevShek' DL1000 K3 - with Mods & How To's
« Reply #16 on: March 14, 2012, 17:46:46 »
7) 12 Volt Power Socket

Well, I've had a few intense days of bike fiddling action, for off, I installed a 12 volt power socket. I decided to go under the seat, as if I'm going to be charging anything, it would be my phone, so it would be nice and safe under there.

I bought a waterproof cigar power socket off ebay for not oo much money, then set about making a mounting plate for it. I used a sheet of aluminium, cut out a piece to the right width/length, bent it just past 90 degrees and cut out the hole to mount the socket.


Using a couple of black screws, I drilled and secured it to the locking plate under the seat.


The wiring was done via a relay, taking power from the battery only when the ignition is on. (more about that later)


Heres my phone charger plugging in and powered up.
If you mod it, They will come!
My current bike HERE.
My Old Vee

Offline kevshek

  • Member
  • ***
  • Joined: Feb 2012
  • Posts: 320
Re: KevShek' DL1000 K3 - with Mods & How To's
« Reply #17 on: March 14, 2012, 18:17:11 »
8) Centre Stand

next I fitted a centre stand.
I purchased this kit new from ebay, it was the cheapest one going, which does not always work out the best, as I shall explain.

The kit is made by Moto Frames from http://www.motobrackets.com


And consists of the following items. Note the lack of any distructions!


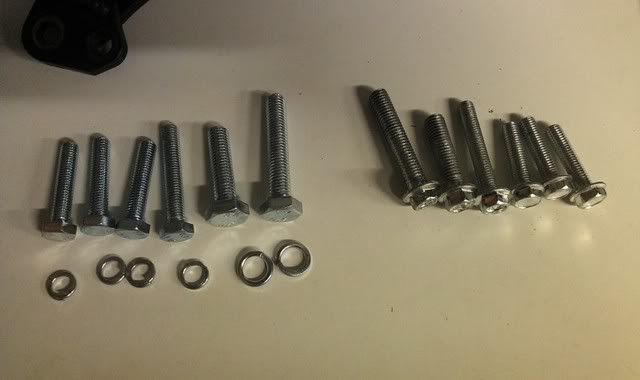
The first time I fitted the stand, I had trouble with the bolt heads rounding as they appear to be made of cheese, and also the stand was sticking when in use, basically it wasn't retracting fully. See this video.


I went to a hardware shop and bought my own high tensile bolts and washers.
New on the left, Old on the right.


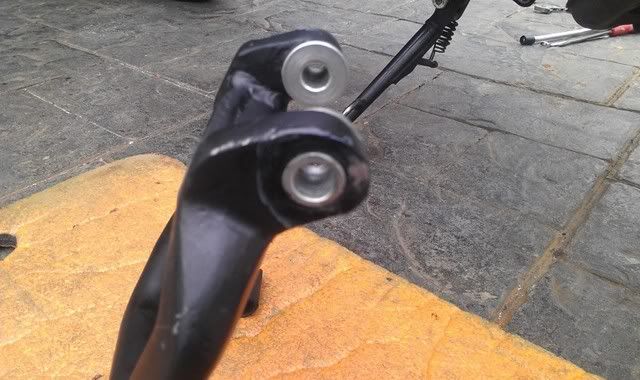
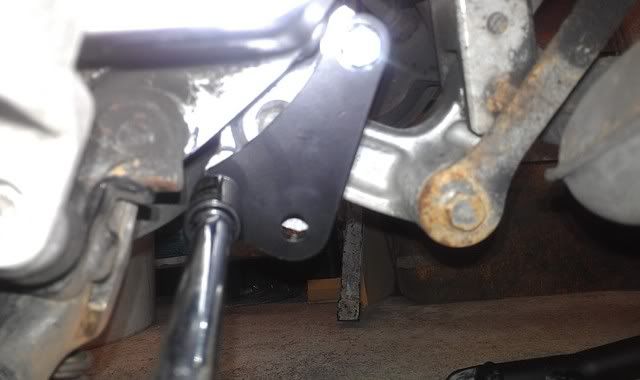
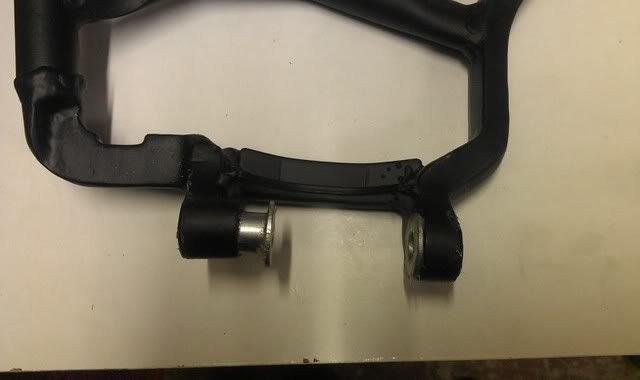
The following 2 pictures show where the black paint has rubbed off, this is a high spot area in the casting which prevented the stand from moving when all the bolts and brackets were tightened. I had to take an angle grinder to this to get clearance.


So to actually install the stand, first, working on the left of the bike, identify the mounting point. This is basically dead centre at the bottom of the bike just in front of the exhaust.


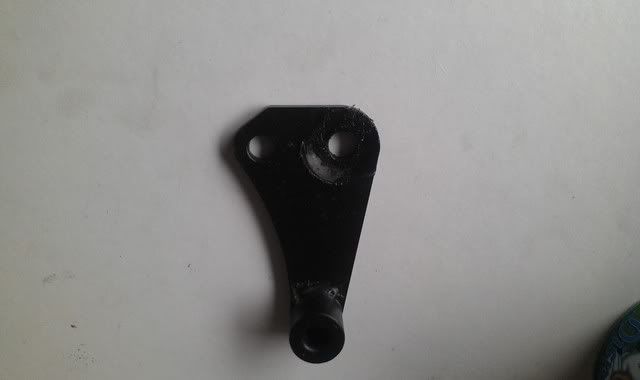
Next find the correct left bracket and using the 2 thinner bolts, secure it in place leaving the bigger hole free. This is for the centre stand itself.


Repeat for the right hand side. The right bracket is slightly wider, has a post sticking from it and uses the longer bolts.
Once both brackets are fitted, you can turn your attention to the stand and install the collars.
Again these are sided, as one side is slightly thicker. I used some grease on these parts as they rotate.


Now the stand is ready to bolt into place using the thicker bolts.


Before installing the springs, you need to install the rubber stopper. The location for this is on the left exhaust pipe. There is a braket/eyelet which is ready to take the rubber stopper. Just use some WD40 spray to help lubricate it on.


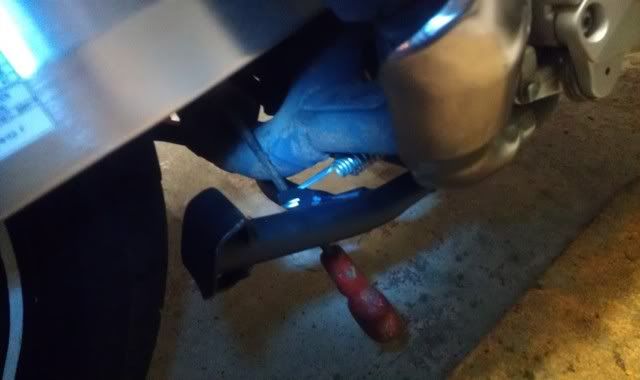
To install the springs, first line the smaller one inside of the larger spring. Now on the right hand side bracket, you have the post, hook the springs onto the post.


Using a long/strong flat screw driver, use the stand as a pivot point, pass it up through the stand and hook the other end of the spring onto the end. Pushing the screw driver forward, pulls the spring back and with a bit of force, you can line them up next to the cut out where they hook onto. Just wiggles the screw driver over and the spring hooks will move into place. Once they are hooked over, just gradually wiggle the screw driver free.


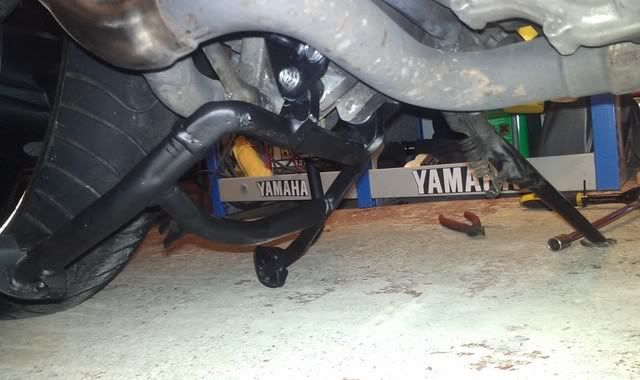
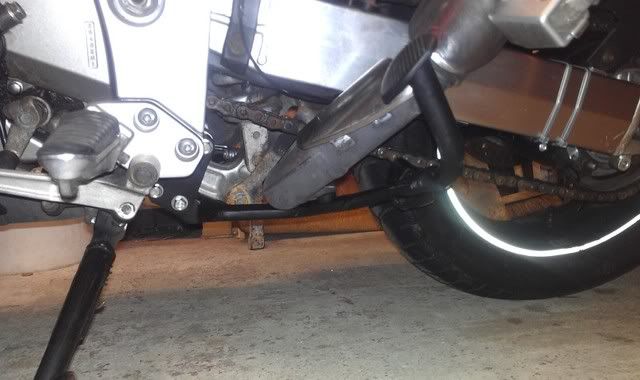
And there you have it, the stand is now installed.


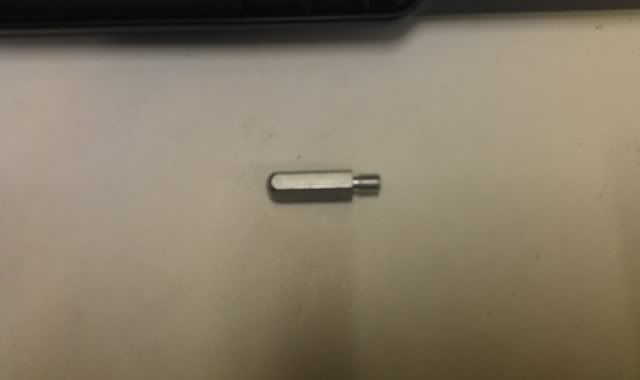
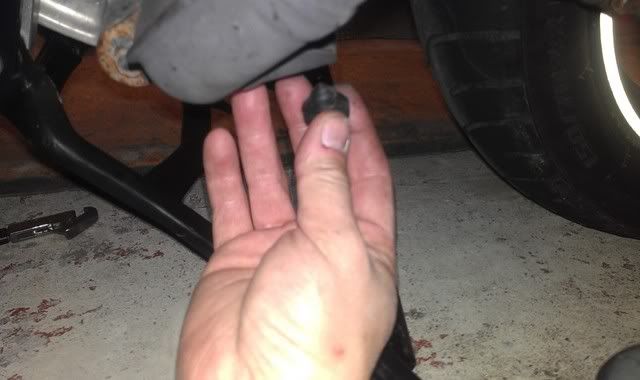
Only problem is, like most things DIY, you always have one left over bit, and I don't have a clue where this goes! If anyone knows, please do tell.
If you mod it, They will come!
My current bike HERE.
My Old Vee

Offline bencav

  • Member
  • ***
  • Joined: Nov 2010
  • Posts: 931
Re: KevShek' DL1000 K3 - with Mods & How To's
« Reply #18 on: March 14, 2012, 18:26:11 »
Any chance of a link to the stand on ebay? I am lookimng into these at the moment and would like to know which to avoid!

Ta!!

Offline kevshek

  • Member
  • ***
  • Joined: Feb 2012
  • Posts: 320
Re: KevShek' DL1000 K3 - with Mods & How To's
« Reply #19 on: March 14, 2012, 18:35:50 »
this is the one I bought.
http://www.ebay.co.uk/itm/150693924341? ... 1439.l2649
I don't know what the others are like or where they are from, but they all tend to be pattern parts. Genuine will cost around £60-70 more
If you mod it, They will come!
My current bike HERE.
My Old Vee